Fully Passwordless Authentication with Flask and Webauthn (Part 3)
Registering a Webauthn Credential
This picks up from Part 2. You'll be lost without it. This is where we left off with the codebase.
I don't really want to force any technologies that aren't related into this post, but my other options were either a ton of page reloads or writing a bunch of javascript. I didn't want to do either, so here we are.
Basically, htmx allows you to send a request to the server like an AJAX request, but instead of getting back JSON or XML, it expects to receive markup that it can swap into the DOM. So we avoid the dreaded full page reload, but still get reactivity without having to write a ton of javascript.
First we need the browser to load the htmx library. So back in the base template, we can add it to the header.
<!-- snip -->
<title>Flask WebAuthn Demo</title>

<!--  Quick and dirty tailwind to save some time on css -->
<script src="https://cdn.tailwindcss.com"></script>
<!-- Load HTMX for some nice reactivity without much js --->
<script src="https://unpkg.com/htmx.org@1.7.0"></script>
</head>
<!--- snip -->
Now we need to change how the form makes its request. Instead of using action and method, we will use hx-post to tell htmx to make a post request when the form is submitted. We will also use hx-swap to tell it to replace the outerHTML of the form (we could use innerHTML but that doesn't make sense in this case).
<!-- snip -->
<div class="max-w-2xl mx-auto">
  <form hx-post="{{ url_for('auth.create_user') }}" hx-swap="outerHTML" class="flex-col max-w-sm mx-auto space-y-2">
    <h4 class="text-2xl font-bold">Register</h4>
<!-- snip -->Now we need to update our view to send back markup for htmx to swap in. We will do the error handling first since it's actually much simpler.
If user creation fails, we want to stay on the form, but show an error message. We don't want to send the whole register page or htmx will swap that in (it looks quite silly when it happens by accident). Since we're rendering the form twice in different places, it makes sense to extract it into another file and include it here. Create a _partials directory next to the register.html template and move the form element into user_creation_form.html. We'll also add some red text to display an error message we might provide to the template
<form hx-post="{{ url_for('auth.create_user') }}" hx-swap="outerHTML" class="flex-col max-w-sm mx-auto space-y-2">
  <h4 class="text-2xl font-bold">Register</h4>
  <p class="italic text-base">
    Create your user account below. We will set up authentication in the next
    step.
  </p>
  {% if error %}
  <div class="text-red-600">{{ error }}</div>
  {% endif %}
  <div class="flex-col flex mt-2">
    <label for="name" class="mb-1 font-bold">Name</label>
    <input
        type="text"
        name="name"
        id="name"
        class="border border-black rounded shadow p-1"
    >
  </div>
  <!-- snip -->
</form>
Now we include that file in register.html and everything should still render correctly. Feel free to restart the app and check.
{% extends 'base.html' %}
{% block content %}
<div>
  <div class="max-w-2xl mx-auto">
    {% include "auth/_partials/user_creation_form.html" %}
  </div>
</div>
{% endblock content %}
Now that we've extracted it, we can just render the partial with an error message and send it back to the browser for htmx to swap in.
# ... snip ...
@auth.route("/create-user", methods=["POST"])
def create_user():
    """Handle creation of new users from the user creation form."""
    # ... snip ...
    except IntegrityError:
        return render_template(
            "auth/_partials/user_creation_form.html",
            error="That username or email address is already in use. "
            "Please enter a different one.",
        )

    return make_response("User Created", 201)
docker compose restart app and try creating a user with the same username you already used. Pretty cool, huh? It would be nice to put the user-entered values back in, but we'll skip that for now and get to the good bit.
If a user account is successfully created, we want to push them on to registering a Webauthn credential so they can leverage their device's biometric capabilities. This is where things get interesting.
WebAuthn requires certain configuration to be sent from the server to the client before setting up a credential. This includes things like valid encryption/hashing algorithms, allowed authentication types, the name of the "relying party" (our server), etc. It all has to be in a specific format, include a challenge and... I don't want to code any of that. Luckily, the webauthn python package will generate it for us, and even serialize it to json. Install that to the project now. You'll have to rebuild the docker container with docker compose up -d --build to add the new dependency.
I don't think that this kind of functionality belongs directly in a view method, so let's create a new file for all our security functionality. Create security.py next to views.py.
import webauthn

def prepare_credential_creation(user):
    ...
In this function, we will call webauthn.generate_registration_options() which requires four arguments:
I have a quick helper function for getting the hostname of the server dynamically that I definitely didn't find on StackOverflow. There are a couple new imports with this as well.
from urllib.parse import urlparse

import webauthn
from flask import request


def _hostname():
    return str(urlparse(request.base_url).hostname)

def prepare_credential_creation(user):
    """Generate the configuration needed by the client to start registering a new WebAuthn credential."""
    public_credential_creation_options = webauthn.generate_registration_options(
        rp_id=_hostname(),
        rp_name="Flask WebAuthn Demo",
        user_id=user.uid,
        user_name=user.username,
    )
webauthn.generate_registration_options will give us a challenge that we need to store, then we can serialize it to json and send the data back to the view for use. Because the point of the challenge is to prevent replay attacks, we want it in temporary storage and to delete it as soon as it is used. If we keep old challenges around in a way that appears valid, we will be vulnerable to replay attacks and defeat the whole purpose. This sounds like a job for Redis to me, by you could use any reliable and temporary key-value store for this purpose. I suppose you could just use Python objects in memory, but that doesn't seem that robust or scalable to me.
We'll need a store, so let's import redis, get the configuration from the environment (which we set in docker-compose.yml), and create a store. You can put this in a separate file if you like, but I didn't. You'll need to import os as well
import os
from urllib.parse import urlparse

import webauthn
from flask import request
from redis import Redis

REDIS_HOST = os.getenv("REDIS_HOST")
REDIS_PORT = os.getenv("REDIS_PORT")
REDIS_PASSWORD = os.getenv("REDIS_PASSWORD")

REGISTRATION_CHALLENGES = Redis(
    host=REDIS_HOST, port=REDIS_PORT, db=0, password=REDIS_PASSWORD
)

# ... snip ...
Now we'll store the challenge in redis. It's up to you how long you want to give a user before timing out, but I'm expiring the challenge after ten minutes. If they don't complete the registration by then, I figure they won't. Then we just serialize the resulting option to json and return it.
import datetime
# ... snip ...

def prepare_credential_creation(user):
    """Generate the configuration needed by the client to start registering a new
    WebAuthn credential."""
    public_credential_creation_options = webauthn.generate_registration_options(
        rp_id=_hostname(),
        rp_name="Flask WebAuthn Demo",
        user_id=user.uid,
        user_name=user.username,
    )

    # Redis is perfectly happy to store the binary challenge value.
    REGISTRATION_CHALLENGES.set(user.uid, public_credential_creation_options.challenge)
    REGISTRATION_CHALLENGES.expire(user.uid, datetime.timedelta(minutes=10))

    return webauthn.options_to_json(public_credential_creation_options)
Back in the registration view, let's call this function, then we'll inject these options into a partial template for htmx to swap in. When the client sends back a credential, it will not contain the user id, which we will need in order to store the credential. We will store the uid on the session for now, but when we upgrade later with better login later we may change it. Flask's session cookie is cryptographically signed using our app's SECRET_KEY, so it's trustworthy as long as the secret key is good (and, you know, secret).
Originally, I just set a user_uid cookie, which is fine for remembering the user later to authenticate again, but is a potential vulnerability if we use a plain cookie in the registration process. Glad I caught that one.
Obviously, you'll need to import the security file we just created.
from flask import Blueprint, render_template, request, session
# ... other imports ...
from auth import security

# ... snip ...
@auth.route("/create-user", methods=["POST"])
def create_user():
    # ... snip ...

    pcco_json = security.prepare_credential_creation(user)
    res = make_response(
        render_template(
            "auth/_partials/register_credential.html",
            public_credential_creation_options=pcco_json,
        )
    )
    session['registration_user_uid'] = user.uid

    return res
Now we need to create that template and can no longer avoid writing javascript. That said, most of the hard work has been handled for us by SimpleWebAuthn. The javascript here has been adapted from the documentation on that site.
First we need to include it. In a real app, you probably only want it in the authentication section, but for simplicity we'll just include it everywhere. We will also pull out the startRegistration globally. When I didn't do this, I got weird bugs from all my htmx swapping. Probably not the best practice, but it works and perfectly clean html and javascript aren't really the point here.
<!-- snip -->
<title>Flask WebAuthn Demo</title>

<!--  Quick and dirty tailwind to save some time on css -->
<script src="https://cdn.tailwindcss.com"></script>
<!-- Load HTMX for some nice reactivity without much js --->
<script src="https://unpkg.com/htmx.org@1.7.0"></script>
<!-- Simple WebAuthn so I don't have to deal with it directly -->
<script src="https://unpkg.com/@simplewebauthn/browser/dist/bundle/index.umd.min.js"></script>
<script>
  const { startRegistration, startAuthentication } = SimpleWebAuthnBrowser;
</script>
</head>
<!-- snip -->
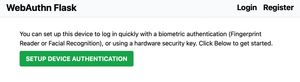
Now we'll write the template. Basically we need a paragraph explaining what we're doing and a button that will trigger the auth flow. Then a bit of javascript to actually do it. Since our WebAuthn registration options are json, we can just inject them directly. Feel free to do it another way if you don't like it. The template will be a partial called register_credential.html
<div>
<p class="mb-2">
You can set up this device to log in quickly with a biometric authentication
(Fingerprint Reader or Facial Recognition), or using a hardware security key. Click
Below to get started.
</p>
<button
class="py-2 px-4 bg-green-600 font-bold uppercase shadow text-white rounded"
id="start-registration"
>Setup Device Authentication
</button>
</div>
<script>
const startRegistrationButton = document.getElementById('start-registration');
startRegistrationButton.addEventListener('click', async () => {
// Here we inject the options. It comes out as a valid javascript object. Neat
const options = {{ public_credential_creation_options | safe }};
let attResp;
try {
attResp = await startRegistration(options);
} catch (error) {
alert("Something went wrong");
console.error(error);
}
// This route doesn't exist yet, we'll create it soon.
const verificationResp = await fetch('{{ url_for("auth.add_credential") }}', {
method: 'POST',
headers: {
'Content-Type': 'application/json'
},
body: JSON.stringify(attResp)
});
const verificationJSON = await verificationResp.json();
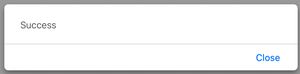
if (verificationJSON && verificationJSON.verified) {
alert("Success");
} else {
alert("Failure");
}
})
</script>Basically the javascript takes the options we've provided and asks the browser to try to authenticate the user in some way. If it's successful, it sends the new credential to the server. For now, if it all works, we just show an alert, but obviously we'll do better than that later.
The javascript we sent on the template will tell the browser to create a new credential. Whatever the browser-specific implementation does, it will verify the user and send the credential back to the server. We need to be ready to receive and save the credential, so they can use it again. We also need to verify the challenge to ensure it is from this session. The python WebAuthn package also has a helper method to pull the credential from the request. We're now using Flask's abort, so we'll need to import that.
from flask import Blueprint, render_template, request, make_response, session, abort
# ...other imports...
from webauthn.helpers.structs import RegistrationCredential
# ... snip ...

@auth.route("/add-credential", methods=["POST"])
def add_credential():
    """Receive a newly registered credentials to validate and save."""
    user_uid = session.get("registration_user_uid")
    if not user_uid:
        abort(make_response("Error user not found", 400))

    registration_credential = RegistrationCredential.parse_raw(request.get_data())
As before, I'd like to take the actual security processing out of the route. We'll save the credential there if it verifies.
# ... other imports ...
from models import WebAuthnCredential, db
# ...snip ...

def verify_and_save_credential(user, registration_credential):
    """Verify that a new credential is valid for the """
    expected_challenge = REGISTRATION_CHALLENGES.get(user.uid)

    # If the credential is somehow invalid (i.e. the challenge is wrong),
    # this will raise an exception. It's easier to handle that in the view
    # since we can send back an error message directly.
    auth_verification = webauthn.verify_registration_response(
        credential=registration_credential,
        expected_challenge=expected_challenge,
        expected_origin=f"https://{_hostname()}",
        expected_rp_id=_hostname(),
    )

    # At this point verification has succeeded and we can save the credential
    credential = WebAuthnCredential(
        user=user,
        credential_public_key=auth_verification.credential_public_key,
        credential_id=auth_verification.credential_id,
    )

    db.session.add(credential)
    db.session.commit()
Thanks to SQLAlchemy, we can use pass the user object into the WebAuthnCredential creation and it will handle setting up the relationship for us.
Now we need to call this in the view and handle the error or send back a json response that the credential verified. I'd like to remember users on their devices so that they don't have to type their username every time, so let's set a long-lived cookie with their user_uid now. We'll need datetime from the standard library for setting the cookie's max-age.
import datetime

# ...other imports...

from webauthn.helpers.exceptions import InvalidRegistrationResponse

# ... snip ...

@auth.route("/add-credential", methods=["POST"])
def add_credential():
    """Receive a newly registered credentials to validate and save."""
    # ... snip ...

    try:
        security.verify_and_save_credential(user, registration_credential)
        session["registration_user_uid"] = None
        res = make_response('{"verified": true}', 201)
        res.set_cookie(
            "user_uid",
            user.uid,
            httponly=True,
            secure=True,
            samesite="strict",
            max_age=datetime.timedelta(days=30),
        )
        return res
    except InvalidRegistrationResponse:
abort(make_response('{"verified": false}', 400))A note on browsers: Generally I'm a huge fan of Firefox. But in this area it falls short. On my MacBook Pro, it only supports security keys. So for this, I would recommend Chrome, a chrome-based browser (Brave, Vivaldi, Edge), or Safari.
Now we can docker compose restart app and see if our hard work paid off. After creating a new user, you should land on another page to set up biometric authentication.
Clicking the button should bring up a browser dialog to choose an authentication method,
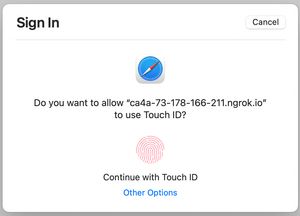
then you should see an alert that it completed successfully.
Honestly, once all the infrastructure is in place, it's not terribly difficult to get working...but there was quite a lot of infrastructure to get to this point.
Of course, we have a few important features missing. For instance, allowing users to log in, acutally logging them in, email verification, and logging in on other devices. However here on line 483 of this markdown file, that seems like a great idea for Part 4.
Here's the codebase at the end of this section.